
RetailOps allows buyers to create new purchase orders (PO) with much flexibility. Buyers can enter key information about products without requiring all information at the time of order. This flexibility offers much convenience to buyers who often do not receive minute details about products until much later.
Set the PO Type and Vendor
- In the Navigation menu, go to Purchasing > PO Create.
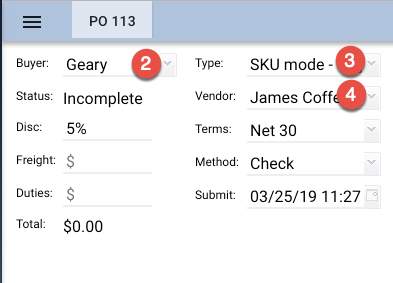
- Set the Buyer. If you leave this blank, it will default to the user creating the account.
- Set the PO Type. There are 3 types:
- Inline
- For typical orders purchased directly from manufacturers.
- These items usually are not bought at a discount; if there is a discount, it is relatively small.
- The buyer has selected specific items in specific quantities.
- Closeout
- For orders of items that have been discontinued, items for which the vendor has overstock, or items that are used.
- These items are discounted significantly.
- Similar to Inline orders, the buyer usually purchases these directly from manufacturers.
- Also, the buyer usually has selected specific items in specific quantities.
- Bulkstock
- Orders, often of large quantities, that may contain items not previously accounted for.
- These items are usually discounted heavily.
- The buyer usually purchases these indirectly from third-party vendors.
- The buyer may have an overview of the items and quantities purchased but not an exact picture.
- Inline
- Set the Vendor. Be sure a vendor profile has already been created (refer to the “Add Vendors” article for more info).
If the vendor profile contains default Terms, Default method of payment, or Default discount, the corresponding fields (Terms, Method, and Disc.) will be automatically populated. Whether or not they are populated, you can modify these fields for the PO.
Enter Order Details
- Set the Discount (or Disc.) in percentage (%) or a flat dollar amount ($). This discount will apply to the Total for the entire order.
- Set the payment cycle Terms, the payment date period in which an invoice must be paid.
- Set the Method of payment.
- Set the date/time to Submit the PO to the vendor contact. By default, this will be set to the date/time that you created the PO. However, you may schedule the PO to be delivered at some point in the future.
- Set the location the items in the PO must Ship To.
- Set the Start Date and Cancel Date, the time frame in which the PO must be shipped.
- Add Vendor Notes for any special info you want to communicate to the vendor contact regarding this PO.
- Add notes on miscellaneous info not recorded elsewhere. These notes will only display internally. Notes manually entered will display in yellow. Some actions will be recorded here automatically (e.g. the creation of the PO, the submission of the PO). Those will display in blue.
Comments
0 comments
Please sign in to leave a comment.