RetailOps Connect is a peripheral device driver which allows RetailOps to communicate with your printers. *Presently, RetailOps Connect is only compatible with Windows 10, we do not offer an OS X version for Mac at this time.
Label printers, document printers, and scales are treated as individual terminals in RetailOps. Each device needs to be granted authorization to gain access to RetailOps. However, since you cannot enter user credentials and an auth code through the devices themselves, you must use the RetailOps Connect (ROC) program.
Generate a New Auth Code
- In RetailOps, under Administration select System Config > Manage Terminals.
- Press the [Register Terminal] button.
- Enter a descriptive Name.
- Set the Type to Proxy.
- Set the Facility where the device will be used.
Install and Configure RetailOps Connect
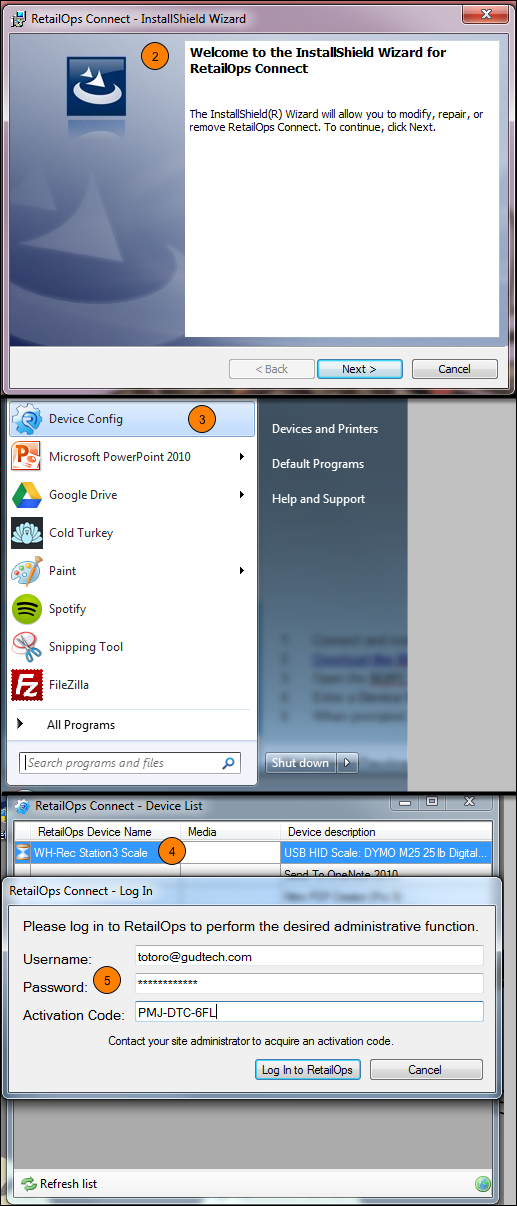
- Connect and install your device to your computer.
- Download the ROC installer and install the program.
- Open the ROC Device Config program on your computer.
- Enter a Device Name and select the Media type.
- When prompted, enter valid RetailOps user credentials and the auth code.
New My Terminal Prefs Roles
As of RetailOps 2.11.10 My Terminal Prefs has been updated to allow setting device roles.
- In RetailOps, go to Administration > My Terminal Prefs. You will open a modal window where you will map your printers and scales.
- Select Add Mapping > In the drop-down menu choose the printer you wish to map from the list. Repeat this step for each printer needed.
Add Role
*At this moment only 4 x 6 Label printers require a role.
- In the My Terminal Prefs window navigate to the line for your 4 x 6 Label printer and select the drop-down menu under Role. Choose the desired role for that printer.
- Repeat steps 2 & 3 for any additional roles needed for the 4 x 6 Label printer.* The Shipping Label and Package Insert roles need to be mapped separately.
Test Your Device
Troubleshooting
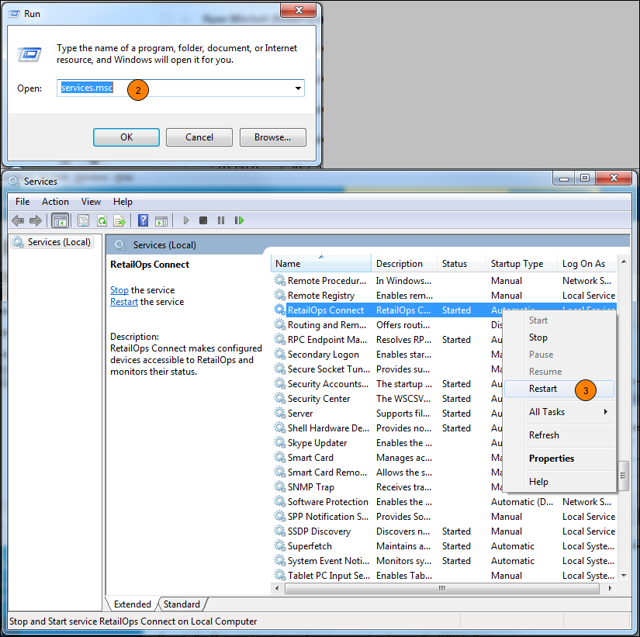
If RetailOps Connect does not connect to the device server, you may need to restart the RetailOps Connect Service in Windows.
- Open the Start menu. Go to Run.
- In the Run window, type in “services.msc” and press the [OK] button.
- In the Services window, find the RetailOps Connect service. Right-click and select Restart.
Legacy My Terminal Prefs (2.10.2 & Below)
- In RetailOps, go to Administration > My Terminal Prefs. You will open a modal window showing the printer and scale preferences for your terminal
- A list of available devices will be shown in the module, you can map these to the correct terminal device by selecting the image of the printer or scale, and clicking on the name of the device it will be mapped to in the side window.
- You can now test your device and make sure that the printer is connected properly, you should get a test print page from the selected printer.


Comments
2 comments
How do we remove an old printer from the list? As systems get updated and change we need to be able to keep the list of devices clean.
Hi Colin!
To remove an old device, you will need to do one of two things, depending on your machine.
- In RetailOps Connect, click into the device name field ("Colin's printer") and delete the text of the printer name. If the printer is still installed on the workstation, it will remain in the list of printers in RetailOps Connect, but will not be displayed within RetailOps "My Terminal Prefs"
- If the above process errors or does not allow you to remove the printer, you'll need to use the following process to clear the registry for RetailOps Connect. This will clear ALL printers for the machine. You will need to reconfigure remaining printers in step 8.
Inactivate the affected terminal in System Config > "Manage Terminals"
Clear the RetailOps Connect settings in the windows registry (steps 3-6)
In Windows 7 or 10, click the Start Button and search for "Run" in the search bar.
In the Command prompt, type "regedit" and hit Enter.
Locate the following folders:
HKEY Local Machine > Software > GudTech
HKEY Current User > Software > GudTech (Please note: You may not have a "Local user" folder, this is ok, proceed to next step)
Select the rows that say "GudTech", right click and select "Delete".
Register a NEW "Proxy" terminal in the RetailOps System Config > "Manage Terminals" tool, authorize RetailOps Connect using this new Auth Key. (Contact Support if you need assistance with this step)
Register the printers again in RetailOps Connect by setting a device name and label media type
Article is closed for comments.