Before you can set the Vendor for a Purchase Order (PO), you must create a vendor profile.
Click the link for information on how to set up vendors for Dropship or JIT.
Add Vendors Individually
- In the Navigation menu, go to Administration > System Config > Vendors.
- At the bottom of the Vendors pane, click on the [Add new vendor] button.
- In the Vendor Detail pane, enter the vendor’s Name. This is the only required field.
- Also in the Vendor Detail pane, you can set the payment cycle Terms, Routing guide, Default method of payment, and Default discount. If these are set, these fields will automatically populate when you create a PO.
Add Vendor Contacts
We recommend entering information for at least one vendor contact in the Contacts pane, particularly an email address. To submit a PO through RetailOps, you must enter a contact email and check the “Email Purchase Orders” box. Otherwise, you will need to manually submit the PO.
- Click on the [Add new contact] button.
- In the Contact Detail pane, enter the contact’s Name, Address, City, Postal code, Country, and State/Province. These fields are required.
- You may also enter the contact’s job Title, Phone number, Fax number, and E-Mail.
- If you enter an e-mail, you have the option to submit POs directly to the contact’s e-mail. Check the Email Purchase Orders box.
Add Vendors in Bulk
Alternatively, you may add vendors in bulk using the Data Import tool.
Required Data in Import File to Add/Edit Vendors
The ONLY data that's required to create new vendors is: Vendor Name.
However, you may also add the following data as desired:
- Default Discount
- Default Payment Method
- Terms
- Vendor Status (Note: Without this field, newly created vendors will default to Status: Active; however, you may use this field to set them to Status: Inactive.)
Required Data in Import File to Add Vendor Contacts
You may also add vendor contacts to new or existing vendors with the following data:
- Vendor Name
- Contact Name
- Contact Address 1
- Contact City
- Contact State
- Contact Country
The following data is optional:
- Contact Title
- Contact Phone
- Contact Email
- Contact Fax
- Contact Address 2
- Contact Address 3
- Contact Postal Code
Directions
- Create a spreadsheet file with the required data (specified above).
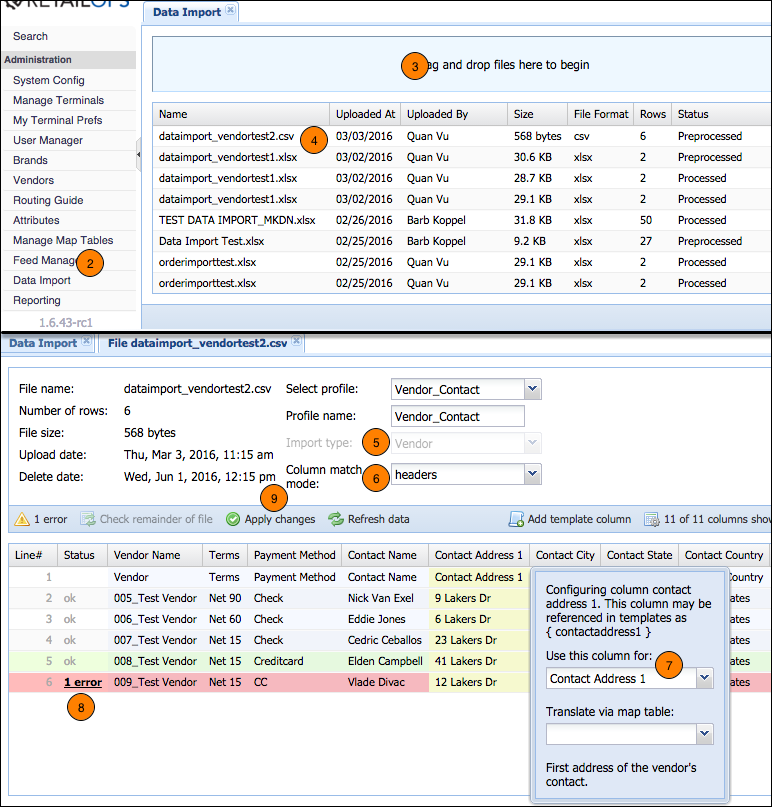
- In the RetailOps web app, go to Administration > Data Import.
- Drag-and-drop your spreadsheet file into the designated area.
- After the import is complete, click on the file Name.
- Either select an existing profile with the Import type of Vendor or create a new profile with that Import type selected.
- For Column match mode, select headers.
- Assign each of the columns to their respective fields.
- If there are any errors, edit data as needed by clicking directly on the desired cell.
- When you have resolved all errors (or if there were none to begin with), press the [Apply changes] button.

Comments
0 comments
Please sign in to leave a comment.