The Data Import Tool allows users to upload bulk file updates directly through the RetailOps interface. This currently applies to the following data file uploads or Import Types.
NEW - See the attached file for a sample product upload template!
Import Types
- PO Manifest. Upload a purchase order manifest to receive items against it.
- Markdown. Modify the Price or MSRP of SKUs.
- Lot Cost Update. Modify the Unit Cost of Lots.
- Bulk Media Edit. Deactivate product images.
- Product Import/Update. Modify product attributes, create new products.
- Map Table. Find predefined input values and replace those with predefined output values.
- Vendor. Add and update vendors’ profiles and contact information.
- Dropship Tracking. Track orders fulfilled by vendors and update the inventory.
- Inventory Quantity. Modify inventory levels for products.
- Customer Orders. Import new customer orders.
Upload the File
- In the navigation menu, go to Administration > Data Import.
- Drag and drop the desired upload file from your computer into RetailOps.
- After the upload is complete (Status: Uploaded), click on the file.
Data Import File Statuses:
- Uploaded - this indicates your file has been properly uploaded to the tool
- Preprocessing - a user has begun formatting the import file, but has not processed it
- Processing - the file is actively being imported. Some larger files can remain in this status for several minutes
- Processed - the file has been applied and no additional changes may be made

Create New Profiles
Profiles are used to streamline recurring tasks. For each profile, RetailOps saves the Import Type and Column Match Mode settings. RetailOps also saves the attributes you assign to each header. When you perform the task a second time--provided the headers of your second upload file matches those of the first--RO will recognize the header and select the correct attribute based on your first selections.
To create a new profile:
- In Select profile, select new profile.
- Enter a Profile name. We recommend using a name that identifies the recurring task you will perform with this profile.
- Select the correct Import type.
- For Column match mode, if your upload file contains headers, select headers. If not, select offsets. We recommend using headers whenever possible.
- If, for Import type, you selected PO Manifest, Product Import/Update, Map Table, or Dropship Tracking, additional settings will populate on the right. Adjust these as needed.

Assign Header Attributes
Header attributes ensure the uploaded data is sent into the correct data fields in RetailOps.
- Click on the header bar for any column marked unassigned.
- Under Use this column for, select the correct attribute. As you scroll through selections, a short description of the attribute will appear at the bottom.
- Repeat these two steps above for every unassigned column.
Validate Data
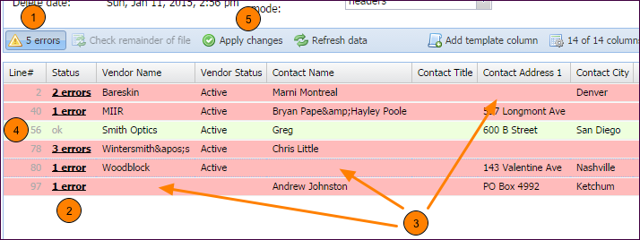
- If there are any errors in the data, the [Error] button will display the amount of errors. Click on the button to show only the rows with errors (displayed in red) and hide all others.
- For each error, hover over the Status. A message will appear indicating the attribute causing the error and how to correct it.
- Click on the attribute causing the error. Edit the data as instructed by the Status message.
- Click away from the attribute. If the edited data is acceptable by RetailOps, the Status will change to “ok” and the row will turn green.
- When you have resolved all errors (or if there were none to begin with), click the [Apply changes] button.
Upload Customer Orders
To upload customer orders using the data import tool, please download and review the attached template "Customer Service Order Upload Template". Each SKU on the order will require one row in the file, and an indication of quantity. Once you've built your file, upload the file using the Data Import tool, and select the column definition using the headers from the sample file. The following columns are required to upload a Customer Service Order:
- Order ID (ideally the reference or order ID from the channel.)
- Bill to Addressee
- Bill to Phone
- Customer Email Address
- Bill to Address Line 1
- Bill to Address Line 2 (optional)
- Bill to City
- Bill to State
- Bill to Postal Code
- SKU
- Sale Price
- Order Quantity
- Shipping Method
- Ship to Address line 1
- Ship to Address Line 2 (optional)
- Ship to City
- Ship to State
- Ship to Postal Code
- Ship Country
- Ship to Addressee


Comments
0 comments
Please sign in to leave a comment.