New in RetailOps 2.5 - Users can hide completed counts by selecting the new [Hide Complete] button.
The Inventory Count tool allows you to audit your inventory to maintain the accuracy of your inventory assortment. Look to the flowchart below for an overview of the process.
How Blinds Work
Before you begin, it would be helpful to discuss the concept of blinds and how they function.
Blinds can be thought of as the number of times that your inventory's count must be confirmed. Say you have a count job with blinds set to "1". If RetailOps reports that you have 10 units of Item A and then user Adam counts 10 units, he has confirmed the correct amount once and you do not need another user to count those again.
However, if Adam counts only 8 units of Item A, since there is a discrepancy between RetailOps' reported quantity and Adam's count, a second user must count to confirm there are 8 units of Item A. In the highly unlikely case that the second user Kelly counts 10 units, a third user must come in to confirm the 10 units that she counted. So basically in this situation, you need two consecutive sources to agree on the count. Those sources will either be RetailOps and the first user, or two consecutive users. If the blinds were set to "2" instead, you would need three consecutive sources and so on.
You should also note that the inventory count functions on a container-by-container basis. That means, if there is any discrepancy for any item inside a container, all items inside the container must be recounted and confirmed by another user.
Create a Count Job and Assign Containers
- In the web app, go to Warehouse > Inventory Count.
- In the Counts pane, press the [New Count] button.
- Click on the new line and enter a Name for the count.
- Set the number of Blinds for the count.
- In the Counts pane, select the newly created count. In the search field in the Containers pane, enter the container IDs of containers to be included in the count job.
- Select the desired container(s) and press the [Add containers] button. Search for and add as many containers as desired to the count job.
- To start the count, look to the Counts pane. Toggle the red dot next to the count Name.
Count Items in Assigned Containers
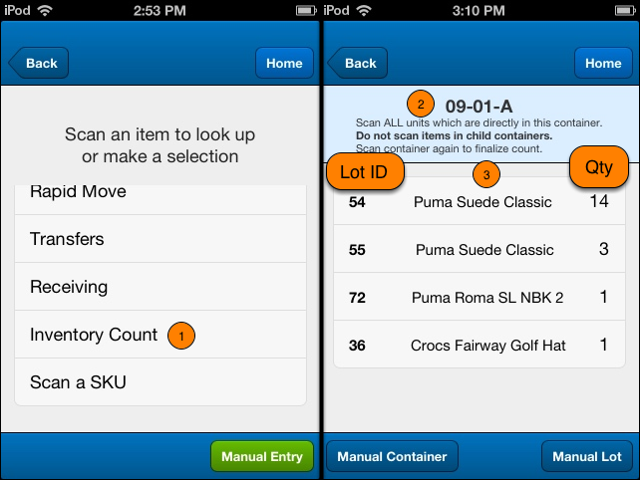
- In the handheld app, go to Warehouse > Inventory Count.
- Scan the container ID.
- If you cannot scan the container ID, you can enter it manually. Press the [Manual Container] button, enter the ID, and press the [Done] button.
- Scan the lot IDs for all items in the container.
- Note: If you have items stored within totes which are stored inside the container, do NOT scan those items. Since totes are containers, they must be added to the count job before being eligible for the count.
- If you cannot scan the Lot ID, you can enter it manually. Press the [Manual Lot] button, enter the ID, and press the [Done] button.
- When finished, scan the container ID again.
Check Count Progress
To check on the progress of a count job, select the desired job from the Inventory Count tool in the web app. Look to progress graph at the bottom of the screen.


Comments
2 comments
How do we make the second blind count. Having another person try to count the same section results in an error "No Count Requests Found".
Hello Jason,
Our apologies on the ridiculously tardy response here! We found that we were not receiving alerts of comments on articles in the KB recently. While you likely found the answer to this comment (question) already, for those who might see this going forward, below is the answer:
If you want to do a double blind, you'll want to configure the Count in question with "2" in the "Blinds" column (see image above). Note, there is functionality built into RetailOps such that a specific successful count where logical = physical count, may fulfill more than one Count.
Please sign in to leave a comment.