There are 4 different ways to upload media into RetailOps, each suited for different situations:
- If you’re taking photos using the RetailOps Connect Photo Console or if the filenames for your image files follow the required file-naming convention, the Media Upload tool would be your most expedient option to upload media in bulk.
- If you’d like to upload images for a single product family, you can drag-and-drop the images into the family through the Product Information Manager (PIM).
- If your images are hosted on a third-party site, you can upload image URLs through the Data Import tool.
- Finally, if you have experience with API, you can make an API call to upload media.
Upload Media through the Media Upload tool
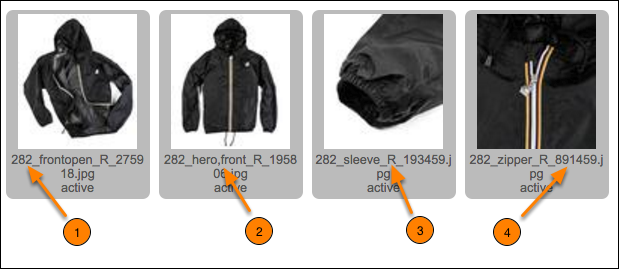
The Media Upload tool allows you to upload thousands of images at once. However, before you upload any media through this tool, you must be sure that the filenames for the images follow the naming convention below. This ensures that the images are linked to the correct SKUs and that they have the correct properties.
If the images were taken using the ROC Photo Console, the filenames for the images will already follow the correct naming convention.
File-Naming Convention
- SKU
- Tags. Set tags for the image. You may set multiple tags to an image by separating the tags by a comma. (Image tags may not contain numbers, spaces, or special characters)
- Association. Specify whether the image should be Representative (represented by ‘R’) or Exclusive (represented by ‘E’).
- For more info on the difference between Representative and Exclusive associations, read this FAQ article here.
- Photo ID. This is a unique string to distinguish between different image files.
Note: In RetailOps Version 1.6.28, we introduced the ability to edit SKU numbers. Note that SKU numbers with underscore characters "_" will cause issues with the naming convention.
Use the Media Upload tool
- In RO, go to Product > Media Upload.
- Drag-and-drop the images into the tool.
- If you encounter any errors, you can select them to view the error Message at the bottom. You can press the [Retry Error] button to try the upload again.
- You can clear images from the Media Upload screen by pressing the [Clear Error], [Clear Uploaded], or [Clear ALL] buttons.

Upload Media through the Product Information Manager (PIM)
- In RO, search for and open the desired product family.
- Select the SKU to which the images should be associated. Drag-and-drop the images into the Media section at the bottom.
- Click on one of the images to open its properties.
- Under Tags, enter “feature” for Feature images. Enter “alt” for Alternative images.
- Set the Associations to be either Representative or Exclusive.

Upload Media through the Data Import tool
If your product images are hosted on a third-party site, you can upload them to RO using the Data Import tool. You would include them in your upload file by entering the URLs for each of the images. You would then import them using the Import Type, Product Import/Update.
For more details on using the Data Import tool, refer to this help article here.
Upload Media through the API
You may also upload images using the API. For more info, refer to this help article here.

Comments
0 comments
Please sign in to leave a comment.