You may create new products in bulk using the Data Import tool.
This is useful when you are first deploying onto the RetailOps app and you need to migrate product data from your old system into RetailOps.
This may also be used to manage channels that don't have a direct integration with RetailOps.
Required Data in Import file
To import products, import a spreadsheet with the following data. We recommend using a CSV:
- Brand
- Product Name
- MPN
- MSRP Price
- Offer Price
- Media URLs
- Any other required product/SKU attributes
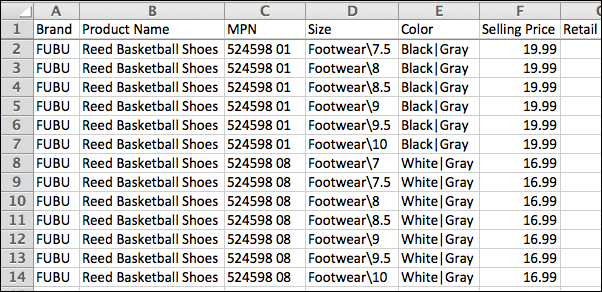
Please note: You must be sure that each row of data in your spreadsheet is unique to create unique SKUs.
* Known Issue: The last line of the spreadsheet is skipped when uploaded; you must add a line at the bottom of your spreadsheet. Example: In the image above, you could enter 'test' or ' . ' into row 15 column A. This will ensure the full Data spreadsheet imports.
Data Formatting
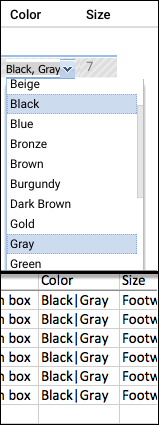
Certain data requires special formatting before import. This includes media URLs, values nested in attribute groups, and multiselect attributes.
Media URLs
For media URLs, you must enter the data in the format below. Note the image tags followed by the > sign. Each image URL must be separated by a pipe "|" character:
ImageTag>http://imageURL1.com|ImageTag>http://imageURL2.com|...For example:
hero>http://retailops.com/img/1000348.png|back>http://retailops.com/img/1000349.png|side>http://retailops.com/img/1000350.pngNested Values
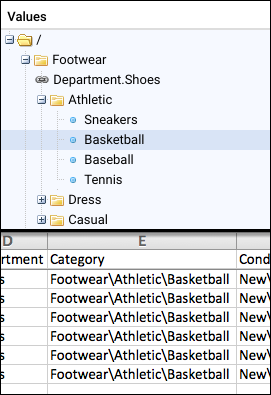
For attributes with values nested inside of groups/folders, format the data on your spreadsheet as shown below:
Directions
-
Create a spreadsheet file with the required data (specified above).
- Known Issue: Last line does not import add another line at the bottom list (see above)
- In the RetailOps web app, go to Administration > Data Import.
- Drag-and-drop your spreadsheet file into the designated area.
- After the import is complete (Status: Uploaded), click on the file Name.
- Either select an existing profile with the Import type of Product Import/Update or create a new profile with that Import type selected.
- For Column match mode, select headers.
- Check the SKU Optional box.
- For Update Mode, select Create only.
-
Assign each of the columns to their respective fields.
- Be sure to differentiate between Product Attributes (applied to the entire product family) and SKU Attributes (applied only to the unique SKU in the family).
- Use an Identifying Product Attribute and select "Use to Match Product" to group all new SKUs with matching values into one Product family ID.
- If there are any errors, edit data as needed by clicking directly on the desired cell.
- When you have resolved all errors (or if there were none to begin with), press the [Apply changes] button.
- Uploaded - this indicates your file has been properly uploaded to the tool
- Preprocessing - a user has begun formatting the import file, but has not processed it
- Processing - the file is actively being imported. Some larger files can remain in this status for several minutes
- Processed - the file has been applied and no additional changes may be made


Comments
0 comments
Please sign in to leave a comment.