Prior to accepting an order return, many retailers require customers to obtain an RMA (return merchandise authorization) from a customer service rep. Customer service reps can issue RMAs through the Customer Service tool. You can also email your customer a prepaid shipping label to make the returns process quick and easy.
Search for the Order
- Go Customer Service > Search.
- Find the desired order and click to open it.

Issue the RMA
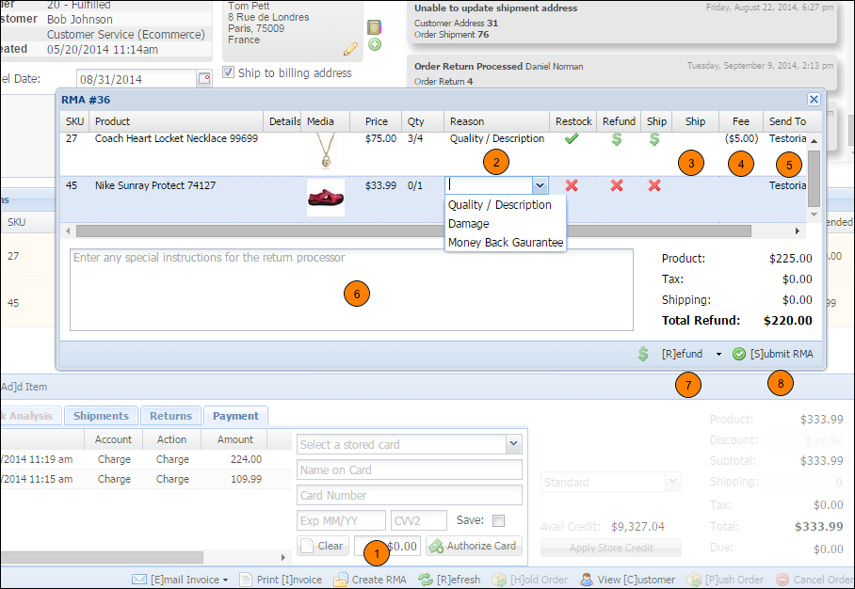
- At the bottom of the Order record, press the [Create RMA] button.
- On the RMA window, enter the Reason for returning the item. Doing so will load pre-determined settings for Restock, Refund, and Ship. However, you can modify them to your needs.
- Restock: Determines whether the item should be restocked.
- Refund: Grants permission to refund a particular item on the order.
- Ship: Controls whether shipping costs are refunded as well. Refunded costs will be prorated.
- Under the second Ship column, you can manually enter a refund amount for shipping. This overrides the prorated amount.
- Under Fee, you can charge any additional fees associated with returns such as restocking fees.
- Select the facility to which returns should be shipped.
- Optionally, you may enter special notes and instructions for the returns processor.
- In the bottom-right corner of the RMA window, toggle the [Refund/Store Credit] button.
- [Refund]. The amount will be issued back to the customer’s method of payment.
- [Store Credit]. The amount will be refunded in the form of Store Credit.
- To email a return label to a customer, select [Email Return Label], and select a shipment carrier class. You may also enter a fee for the return label in the "Return Label Fee" field at this time. (To learn more about setting up your account to email return labels to your customers, please read more here: Email Return Labels )
- Press the [Submit RMA] button. This will create the RMA, and email a return label PDF to the customer if selected.


Comments
0 comments
Please sign in to leave a comment.